Water damage can strike unexpectedly, whether due to flooding, burst pipes, or severe weather. Addressing it promptly and correctly is critical to prevent long-term structural damage, mold growth, and health hazards. Effective water damage cleaning requires a methodical approach, combining safety precautions, proper equipment, and strategic techniques. In this article, we’ll explore 10 essential steps to ensure your water damage cleaning process is both thorough and safe.
Assess the Situation Quickly
The first step in any water damage cleaning process is to evaluate the extent of the damage. Identify the source of water and the areas affected. This assessment helps determine the level of urgency, the type of cleaning required, and whether professional intervention is necessary. Documenting the damage with photographs can also be helpful for insurance claims. Remember that water damage can spread quickly, so rapid evaluation is crucial.
Ensure Safety Precautions
Before entering a water-damaged area, ensure your safety. Turn off electricity to affected areas to prevent electrocution, and wear protective gear such as gloves, waterproof boots, and masks to avoid exposure to contaminated water. Floodwater often contains bacteria, chemicals, or sewage, which can pose serious health risks. Proper precautions protect both you and anyone assisting with the cleanup.
Stop the Water Source
Water damage cleaning is futile if water continues to enter your home or property. Identify and stop the source, whether it’s a leaking pipe, a broken appliance, or external flooding. Temporary solutions such as shutting off valves, using sandbags, or placing barriers can help control water flow until a permanent fix is applied. Stopping the water prevents further damage and reduces the complexity of cleanup.
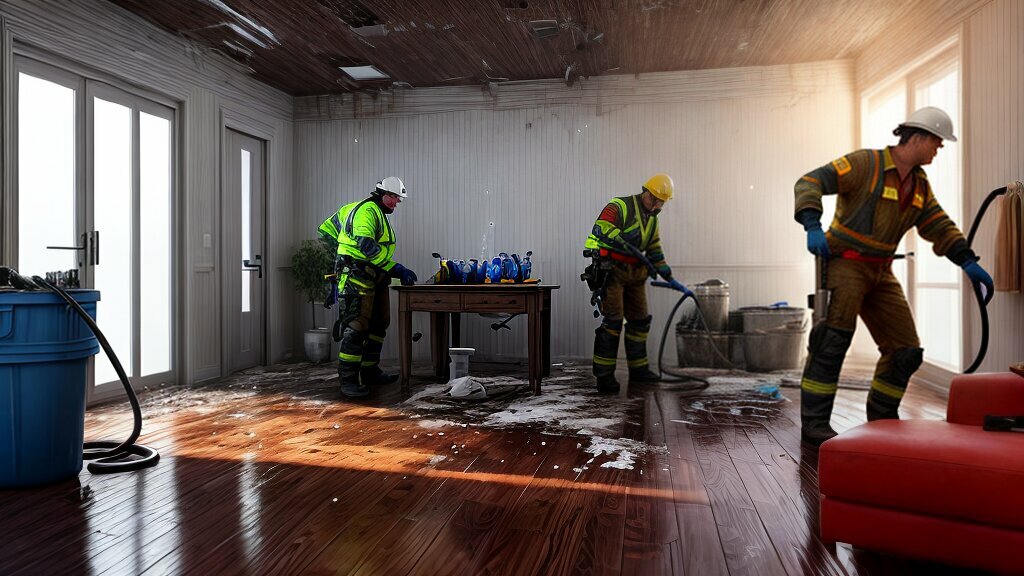
Remove Excess Water
Once the water source is stopped, the next step is to remove standing water. Use pumps, wet-dry vacuums, or buckets depending on the volume of water. Prompt removal reduces the likelihood of mold growth and structural damage. For large-scale water damage, professional-grade equipment may be necessary to ensure efficient water extraction.
Dry and Dehumidify the Area
After removing excess water, drying the space thoroughly is essential. Use fans, dehumidifiers, and ventilation to eliminate moisture trapped in walls, floors, and furniture. Proper drying can take several days, and it’s important to monitor humidity levels to prevent mold. Moisture meters can be useful to check hidden damp areas that may not be visible.
Remove Damaged Materials
Water can irreparably damage certain materials such as drywall, insulation, and carpeting. Removing these compromised materials is a critical step in effective water damage cleaning. It prevents the spread of mold and ensures that restored areas remain safe and durable. Dispose of damaged materials according to local guidelines to minimize contamination.
Clean and Sanitize Surfaces
Cleaning surfaces affected by water is not enough; sanitization is equally important. Use antimicrobial solutions to disinfect floors, walls, and other surfaces. This step eliminates harmful bacteria and prevents mold spores from taking hold. Focus on high-touch areas and spaces where water may have pooled, as these spots are particularly prone to contamination.
Inspect and Restore Structural Integrity
Water damage can compromise the structural integrity of your home or property. Inspect walls, floors, and foundations for signs of weakening, warping, or rot. Reinforce or replace affected areas as needed to ensure safety. Consulting a professional contractor may be necessary for extensive damage to prevent future hazards and ensure proper restoration.
Prevent Mold Growth
Mold is one of the most serious consequences of water damage. Even after thorough water removal, mold can develop if moisture remains. Use dehumidifiers, maintain proper ventilation, and apply mold inhibitors to reduce the risk. Regularly inspect hidden areas such as behind walls or under flooring to catch mold early before it spreads.
Conduct a Final Check and Maintenance
The last step in water damage cleaning is a comprehensive final inspection. Ensure that all affected areas are dry, sanitized, and restored to their original condition. Keep an eye on potential weak spots or signs of lingering moisture over the following weeks. Ongoing maintenance, such as checking plumbing and monitoring humidity, can help prevent future water damage.
Water damage cleaning is a meticulous process that requires attention to detail, proper equipment, and knowledge of safety protocols. By following these 10 essential steps—assessing the situation, ensuring safety, stopping the water source, removing excess water, drying the area, removing damaged materials, cleaning and sanitizing, inspecting structural integrity, preventing mold, and conducting a final check—you can protect your property and health while minimizing long-term damage. Quick, organized, and thorough action is the key to successful water damage cleaning, ensuring your home or business remains safe and habitable.
These steps are not only practical but essential for anyone facing water-related emergencies. While minor cases can be handled with DIY methods, severe water damage often requires professional expertise. Taking swift action and adhering to these guidelines can save both time and money while preventing future complications.
By prioritizing safety, using the right tools, and following a structured approach, water damage cleaning can be completed effectively, leaving your space dry, clean, and safe. The key lies in combining immediate response with long-term preventive measures, creating an environment where water damage does not have lasting effects.